
You’re one step closer to hittin’ the pavement on your Schwinn electric bike! Before riding, always make sure your tires are inflated and that your brakes are working properly. Read the quick start guide below and your Schwinn bicycle owner’s manual. Both contain important safety information.
You'll need the following tools
- 6 mm hex key
- Phillips head screwdriver
- Pedal wrench or adjustable wrench

Install Handlebar/Stem Assembly
Confirm fork and handlebar stem face forward. Verify the brake and shift cables wrap around the frame without kinks or twisting. The shift lever should be on the rider's right-hand side Insert the quill of the stem into the steerer tube of the fork past the minimum insertion markings on the stem quill. Locate where the front wheel will be in the fork, center the stem to align with that position, and use a 6 mm hex key to secure the stem quill bolt.

Connect Controller
Connect the green cable from the handlebar to the corresponding cable at the head tube, or front of the bicycle. Simply line up the arrow on the plug and press together. The color on the plug should disappear when it is properly connected.

Install Front Fender
Position the front fender so that the mounting bracket is on the backside of the fork crown. Align the hole in the bracket to the hole in the fork crown. Place a washer on the fender mounting bolt. Insert the bolt through the frontside fork crown hole and through the fender bracket. Place a washer on the bolt, add the hex nut, and then hand-tighten.
Next, secure the fender struts to the middle of each fork leg. Remove the left-side bolt, place the fender strut over the bolt hole, and reinstall the bolt. Tighten the bolt with a screwdriver. Repeat this process on the right side of the fork. Once both struts are attached, center the fender in the fork and securely tighten the mounting bracket hex nut.

Install Seatpost
Open the seatpost quick-release lever, then slide the seatpost into the frame. Ensure the seatpost is inserted past the minimum insertion line marked on the post. Close the seatpost quick-release lever.

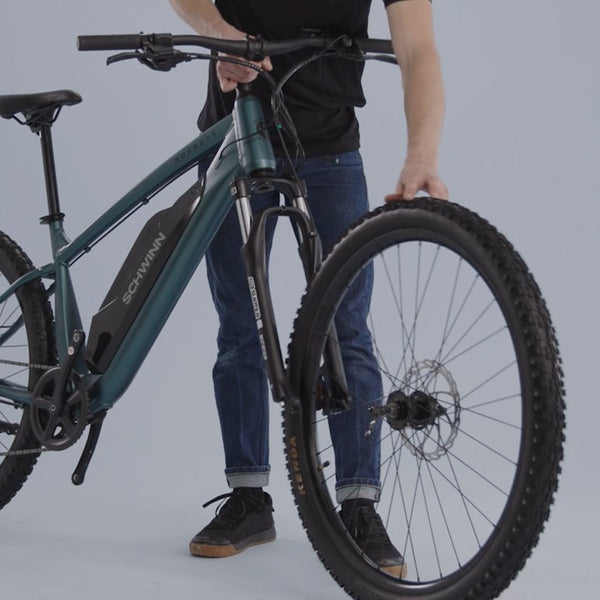
Attach Front Wheel
Locate the quick-release skewer. Remove the adjusting nut and one spring. Insert the quick-release skewer through the front wheel axle, from the side opposite the brake disc. Reinstall the spring, narrow end first, and lightly tighten the adjusting nut. Remove the fork spacer at the dropouts. Lift the front of the bike and roll the wheel back, ensuring the brake disc goes into the brake caliper, then lower the fork dropouts onto the axle. Tighten the adjusting nut, then close the quick-release lever. Spin the front wheel to ensure there is no rubbing between the tire and the fender.

Install Pedals
Lightly grease pedal threads with a lithium-based grease. Carefully hand-thread pedals into the crank arm. Note that pedals are side specific, as designated by the R (gear-side) and L (non gear-side) stickers on the pedals. The L, non gear-side pedal is reverse threaded. Securely tighten pedals with a pedal or adjustable wrench.

Adjustments & Safety Check
Adjust seat height. It should be about hip level when you’re standing next to the bike.
Squeeze the brake levers. Confirm that all control cables are properly seated and securely engaged, and that you can apply full braking force on the levers without the levers touching the handlebar.
While squeezing the brakes, attempt to roll the bike back and forth; confirm that the brakes are operating correctly. If not, your brakes may need adjustment. Do not ride the bike until the brakes are properly adjusted by a qualified bicycle mechanic.

Check Tire Pressure
Inflate the tires to the manufacturer’s recommended pressure, which is marked on the tire sidewall.

Battery & Controller
Ensure battery is charged.
Toggle the power button on the battery pack to turn on the battery. Next, press the power button on the controller to turn on the pedal assist system. Test functions before first ride.
And that’s it! Just put on your helmet and you’re ready to ride.